| Main page | Læs denne side på dansk |

|
Turning a bowl in green (fresh) wood
If you want to turn a large deep bowl from one piece of wood, you usually have to turn it from fresh (green) wood. The reason for this is that it is usually not possible or at least inconvenient to dry a large piece of wood without getting cracks, so you can't buy dry wood of large dimensions. Many other objects can be turned from green wood, but bowls are the most common, so they are used for this description.Another reason for turning green wood is that it is a fantastic feeling (and smell) to turn green wood. It is soft and easy to turn and you can take amazingly large shavings. But be careful - sap can spatter around!
There are to basically different methods to turn a bowl from green wood: The most common is to rough turn the bowl green, let it dry and finish the turning when the bowl is dry. This is described first. The other possibility is, of course, to finish turning the bowl while the wood is green. This is described at the bottom of this page.
Method 1: Rough turning, drying, final turning
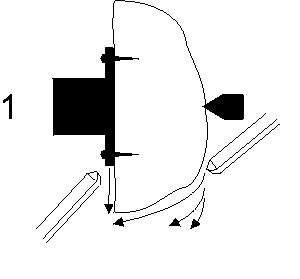
The numbers in the text refer to the illustration to the right. The drawings shows the bowl seen from above the lathe.When turning a bowl from green wood, you often begin with a rather raw piece of a trunk. As mentioned under 'Drying of wood', there is a risk that cracks forms in the wood during the drying if the pith is included. Therefore, it is safest to split the trunk so that the pith isn't included. However, it IS possible to turn objects from full sections of a trunk.
If you start with something like half a cylinder, half a 'slice' of trunk, you may cut it more round with a chain saw or a band saw. This makes it easier and much faster to turn and otherwise it may be too big for the lathe.
 1. The wood can be mounted on the lathe in many ways (see Mounting the wood) but the most common is to use a faceplate with many long screws. The surface doesn't have to be perfectly flat if you use sufficient screws. Is it very irregular, you can flatten it with an axe or a big chisel.
You can also use a pin chuck, screw chuck or a big spur drive and the center for the mounting. A faceplate with sharpened screws mounted on it is a good spur drive for green wood. If the piece of wood is large and/or out of balance, the centre in the tailstock should be used for support. If there is bark on this side, the centre has to be pressed hard against the wood to penetrate to the robust wood, or the bark can be removed from the area where the centre touches the wood. Remember to use the slowest speed of the lathe - before starting the lathe! The speed can be increased afterwards if the lathe and the blank allows for it. For the rough turning a heavy bowl gouge (e.g. 20 mm) is useful but a normal bowl gouge (about 10 mm) is also fine, it is just somewhat slower. Start turning at the rim as you would when turning a bowl from a square blank of dry wood. In the beginning the turning goes very slowly. The lathe speed must be very low and the tool only touches the wood at the very most protruding parts. Slowly, as the blank gets more round, the tool cuts more of the time and the speed may be increased a little too. It is important not to press the tool agaist the wood as this only increases the bumping of the tool on the irregular surface. If the tailstock centre is used for support it is difficult to turn the parts close to the centre. They may be left to be turned later when the blank is more round and the centre can be moved away. When the blank is round on the outer side, the outer parts of the side facing the faceplate is trued off. This may is done using the bowl gouge as a scraper as shown in the illustration to the right and descibed in the guidlines for turning a bowl from dry wood. | |||
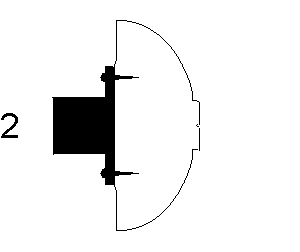 2. Now, the centre is removed if it is still in use. A tenon or recess for mounting in a scroll chuck is turned. Ensure that there isn't any bark or cambium (the growth layer right under the bark) left as these are weak and can't be used for mounting the bowl in the chuck - at least for larger bowls. The tenon has to be so large (compared to the jaw capacity) that it can be turned smaller after drying and still be held by the chuck. Finally, the tailstock centre is pressed into the wood to make a centre mark. This mark may be useful when trueing (re-turning) the tenon (or recess) after drying or when reverse mounting the bowl for turning the tenon away.
The blank is removed from the faceplate and mounted in the scroll chuck. The 'flat' surface is trued off and the bowl is hollowed exactly as if it was turned from a dry blank. The walls of the bowl have to be much thicker than you want in the finished bowl. The thinkness should allow for turning away the warpage of the bowl created by the drying. Usually, a thickness of 2 cm for smaller bowls to 5 cm for larger bowls is good - more if you want a large wall thickness in the finished bowl. | |||
 3. When the hollowing is finished, the bowl is weighed and weight and date is written on a piece of paper.
The drying of the bowl can be done in many ways. I recommend placing the bowl in a paper rubbish bag that is closed and placed in a cold room or outdoors in a shaded shelter. About once a week the bowl can be weighed and the weight and date written on the same paper as the initial weight and date. When the weight loss per week is only a fraction of the initial weight loss, the bowl can be moved to a heated room, still in the closed bag. The weekly weighing continues and when the weight is almost stable, the bag is opened. After further a couple of weeks the bowl can be taken out of the bag and dried in free air for at least some weeks. The whole process usually takes 2-3 months. If you want the bowl dry faster, you can try drying in the microwave oven. | |||
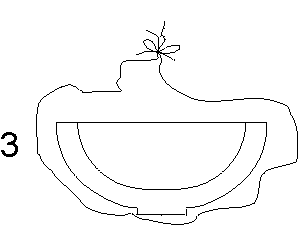
 4. The bowl is now dry and you will see that it has shrinked and warped - and hopeully not cracked. The wood has primarily shrinked across the grain so that the bowl is now probably a little oval and the rim of the bowl is higher at the end grain ends.
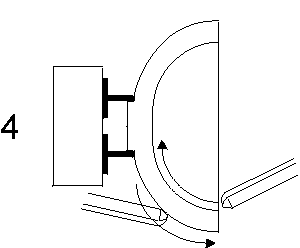
Due to this deformation of the bowl, the tenon (or recess) for mounting in the scroll chuck is also deformed, and it may be difficult to mount the bowl securely in the scroll chuck. The bowl should be mounted with the grain in diagonal to the jaws to get the best grip (if the chuck has four jaws). I.e. the grain should go from the gap between two jaws to the gap between the two opposite jaws. If you can't achieve a secure mount in the chuck, you have to re-turn the tenon (recess). This is done by mounting the bowl as described under removing the tenon in the instructions for turning a bowl in dry wood. Moount the bowl in the scroll chuck and start the lathe at a speed somewhat lower than usual for the size of the bowl. Try increasing the speed but not so much that you get vibrations. Turning the inner side of the bowl is done as when hollowing a bowl made from dry wood, but you have to cut more carefully in the beginning because of the warped bowl. When the bowl is round on the inner side, it is turned round on the outer side. This is a little difficult, at least if you want to turn with the grain from the chuck towards the rim as there isn't sufficient room, at least close to the chuck. This area can be turned against the grain or you can wait turning it until the bowl is reverse-mounted for removal of the tenon. When the outer side is round, the shaping and final turning of the bowl can begin. If the bowl is large or the walls have to be thin, you have to start from the rim and finish step by step. With big or thin bowls you have to keep a decent wall thickness below the point where you are turning, otherwise the bowl will become unstable and vibrate. You should also sand it step by step. When the whole bowl except the tenon is turned and sanded, it is removed from the chuck. Then it is mounted as described under removing the tenon in the instructions for turning a bowl in dry wood, and the tenon/bottom is turned and sanded. Finally, the bowl is finished with oil or whatever you like. Method 2: Finishing turning while the wood is greenYou may choose to finish turning the bowl while the wood is still green (wet). This will result in a more or less warped finished bowl. This can be utilised to give a more interesting shape of the bowl. If the wood warps much and the walls are turned thin, the bowl can get wrinkled or wavy.The bowl is turned entirely as if it was turned from dry wood. Though, to avoid the wood drying and warping during turning, you may sprinkle water on the wood now and then. If you have a break, wrap the wood in plastic. If it is necessary to have a long pause, you can wrap chuck and wood in plastic and place it the freezer to avoid mould building on the wood. The sanding of the bowl must be done wet, with sanding paper for wet sanding and water as lubricant. The sanding paper is regularly washed in water. You may also let the bowl dry and sand it when it is dry. You may then need to sand by hand because of the warpage of the bowl. You can also dry the surface of the wood with a hair drier so that you can dry sand it more or less immediately. You just have to be careful not to heat the surface too much with the hair drier or the sanding paper as it may induce cracks. If the bowl was sanded wet (or only surface dry) it is now dried fully. To speed up the drying, it can be done in the microwave oven. The fully dried bowl probably has warped so that it is rocking when placed on a flat surface. Then the bottom has to be re-turned. You can avoid this by having turned a ring/ridge on the bottom of the bowl and then cut most of it away leaving three feet.
You are welcome to send me an email if you have comments, corrections or additions. |